Color Checker
 By Albert Pedrosa
IN MY last article, I mentioned about matching the color of what you’re shooting. In this article, I’ll try to cover as much as I can about the process and why you need to understand it. When taking photos, you are actually reproducing the scene, and when you’re capturing colors you can either choose to get an accurate reproduction of it or come up with something very pleasing to your eyes.
Camera manufacturers are making a difference in how they interpret captured data. Their goal is not only to capture the scenes with the best quality but also their best versions. The algorithm on how the image is processed is a tightly guarded secret by each manufacturer. I think that Fujifilm has been really successful when it comes to its camera image processor. They have captured the heart of a lot of photographers when it comes to image treatment.
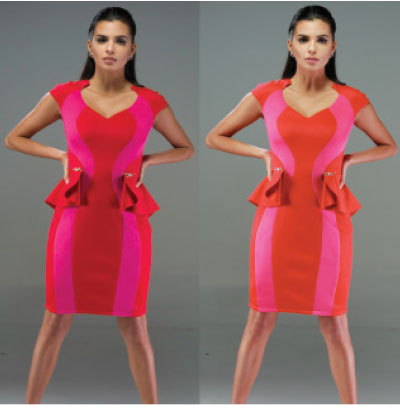
When shooting products, garments or anything that needs to be accurate when it comes to colors, most cameras are a bit poor in performance. They have an image treatment to accurately match the colors of the product, but it still lacks pinpoint accuracy.
Getting the right color plays an important role when it comes to online shopping. Buyers online expect to receive the same color they have seen from their computers. Maybe not a perfect match, but at least it should be a decent match. The best way to get the best match is to use a color checker by X-rite or any other brand that serves the same purpose. The idea is to calibrate your camera by finding the difference between a captured color swatches and the known expected colors of the sample swatch. Once the difference is computed then you can create a profile to correct the difference.
The created profile can be installed in Lightroom or Adobe Camera Raw editor so you can easily apply the correction. Of course it works best with RAW files since Jpegs are saves with all the wow-factor image treatment applied to them. It’s one of the reasons our RAW files are a bit dry in colors because often Lightroom, by default, would use Adobe Standards. This is a standard that’s far from the characteristics of how a particular camera captures colors.
I have to admit that I don’t use color checker a lot since I’m shooting mostly fashion editorials and other commercial shoots like food photography. However, when it comes to product, apparel brands and painting repro, there is no way to capture colors accurately but by making an ICC profile of your camera. You’ll be surprised how close the colors will come out of your calibrated monitor against the actual item.
It is also a good practice to create camera profiles if you’re shooting with more than one camera. It is almost impossible to get exactly the same results from two cameras even if they are the same make. This normally happens when shooting events or weddings where there are more than one photographer shooting the same scene. Camera profile brings all the colors coming from all cameras to end up in the same color space.
Camera color profile is not applicable to all genres in photography, but for commercial shoots, it’s a must. Keep on shooting, everyone!
photomania.sunstar@gmail.com
www.albertpedrosa.com

